


Terry Heimat Workshop
Method: self-study
INTRODUCTION
Visits from students on a sound engineering course have shown that many home studio owners have problems with monitoring sound. This paper is aimed at those who are streaming and want to understand the basic principles of creating quality sound in a control room. Setting up a professional studio has a number of peculiarities, and just a few tricks are often not enough. However, during our research we found that even a home studio, if desired, can be significantly improved without too much effort or expense. At the same time, students attempting to produce acoustic treatments on their own can often do more harm than good.
The problems associated with room acoustics can be divided into two main categories: reflection of mid and high frequencies from hard surfaces, and fluctuations in bass levels due to room size and wall reflectivity. Both of these situations have a negative impact on the accuracy of sound perception and require their own approach to solution.
Recording Studio at Home.
Terry Heimat Studios' guide to monitoring and acoustic processing.
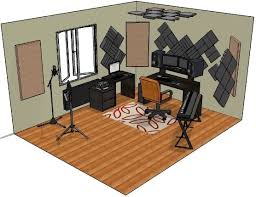
Placement of Monitors and Studio Equipment
Ideally, when sitting in your studio chair, you hear mainly direct sound from the speakers. However, in reality, sound inevitably reflects off room walls—except when recording in an anechoic chamber or using specialized soundproofing equipment. To achieve high-quality sound, it’s important to absorb or direct these strong reflections before they reach your ear. In professional studios, walls are angled to redirect reflected sound. In home setups, walls are typically rectangular, which requires special attention.
Main factors that impair the stereo image in a home studio:
Reflections from the desk and nearby objects can significantly degrade sound quality. Therefore, choosing proper speaker placement before any acoustic treatment is crucial. First, monitors should be installed vertically (not on their sides). Ideally, they are mounted on stands at head level, facing you. Avoid placing speakers too close to room corners—follow the manufacturer’s recommended distances from walls. For optimal stereo imaging, position the speakers symmetrically in the room: in small rooms, along the longitudinal axis, forming an equilateral triangle with the listening point roughly at its center.
It’s very important that no objects obstruct sound between you and the monitors, such as a computer screen, racks, or items on the desk. The desk should be lower than the speaker height to reduce sound reflection from its surface. To check this, use a mirror placed on the desk between you and the speakers—if you can see the speakers in the mirror, reflections may interfere with clarity. They can often be minimized by moving the speakers or using isolation pads. Some speaker systems allow tilting them up or down for optimal sound imaging.
It’s also not recommended to place speakers at equal distances from walls, floor, and ceiling. Uniform placement can cause undesirable peaks and dips in the low-frequency range, degrading balance and sound quality—even if the rest of the room sounds good.
Ideally, when sitting in your studio chair, you hear mainly direct sound from the speakers. However, in reality, sound inevitably reflects off room walls—except when recording in an anechoic chamber or using specialized soundproofing equipment. To achieve high-quality sound, it’s important to absorb or direct these strong reflections before they reach your ear. In professional studios, walls are angled to redirect reflected sound. In home setups, walls are typically rectangular, which requires special attention.
Main factors that impair the stereo image in a home studio:
- Speakers placed on their sides
- Uneven speaker placement within the room
- Insufficiently aimed speakers toward the workspace
- Placing one speaker directly in a corner
- Placing a speaker on a hard surface without padding, especially affecting low frequencies
Reflections from the desk and nearby objects can significantly degrade sound quality. Therefore, choosing proper speaker placement before any acoustic treatment is crucial. First, monitors should be installed vertically (not on their sides). Ideally, they are mounted on stands at head level, facing you. Avoid placing speakers too close to room corners—follow the manufacturer’s recommended distances from walls. For optimal stereo imaging, position the speakers symmetrically in the room: in small rooms, along the longitudinal axis, forming an equilateral triangle with the listening point roughly at its center.
It’s very important that no objects obstruct sound between you and the monitors, such as a computer screen, racks, or items on the desk. The desk should be lower than the speaker height to reduce sound reflection from its surface. To check this, use a mirror placed on the desk between you and the speakers—if you can see the speakers in the mirror, reflections may interfere with clarity. They can often be minimized by moving the speakers or using isolation pads. Some speaker systems allow tilting them up or down for optimal sound imaging.
It’s also not recommended to place speakers at equal distances from walls, floor, and ceiling. Uniform placement can cause undesirable peaks and dips in the low-frequency range, degrading balance and sound quality—even if the rest of the room sounds good.
Sources of Unwanted Reflections
Mid and high frequencies reflect off hard surfaces like plaster or drywall, similarly to how light reflects off a mirror. While not an exact analogy—since some sound energy is scattered or absorbed—hard walls can generally be thought of as acoustic mirrors. Imagine holding a mirror close to a lit bulb—you see both the bulb and its reflection. Similarly, placing a speaker near a wall produces a reflected sound wave, creating a so-called “phantom” image: you hear not only the direct sound from the speakers but also its reflection from the wall.
If you identify the part of the wall where the reflection originates, you can target that area for acoustic treatment. A handy method is to use a mirror: ask someone to hold it against different wall sections as you sit in your studio chair. If you see the speakers’ reflection in the mirror, that spot is a “mirror point” needing treatment.
Typical approach for acoustic treatment:
Additional considerations:
Mid and high frequencies reflect off hard surfaces like plaster or drywall, similarly to how light reflects off a mirror. While not an exact analogy—since some sound energy is scattered or absorbed—hard walls can generally be thought of as acoustic mirrors. Imagine holding a mirror close to a lit bulb—you see both the bulb and its reflection. Similarly, placing a speaker near a wall produces a reflected sound wave, creating a so-called “phantom” image: you hear not only the direct sound from the speakers but also its reflection from the wall.
If you identify the part of the wall where the reflection originates, you can target that area for acoustic treatment. A handy method is to use a mirror: ask someone to hold it against different wall sections as you sit in your studio chair. If you see the speakers’ reflection in the mirror, that spot is a “mirror point” needing treatment.
Typical approach for acoustic treatment:
- Install soundproof panels (usually purple) as the primary step.
- Enhance absorption with orange panels, which are more effective at reducing reflected sound.
- Use acoustic foam (not to be confused with construction foam) for panels.
Additional considerations:
- For bass traps, place them in corners, including the junction of walls and ceiling.
- Position monitors to form an equilateral triangle with your listening point for the most natural sound.
- In a typical rectangular room, main reflection sources are side walls and the ceiling area between you and the monitors. Reflections also come from the floor (often partially hidden by the desk) and the rear wall.
- Don’t overlook reflections from the back wall, as they can affect sound quality, as well as the wall behind the speakers.
- Cover them with soundproofing or absorbing materials.
- Remember, during recording or mixing, you and others move around. Panels should be large enough to cover all reflection points within typical user movements to prevent reflections from interfering with accurate sound perception.
Effective and Ineffective Soundproofing
You might have read articles about how technical editor Hugh Robjohns and I installed acoustic foam panels on studio walls. However, before starting such work, it’s important to understand the limitations of these materials.
For example, if you cover a mirror with dense black fabric, light will be fully absorbed and won't reflect off the mirror. With acoustic foam, the situation is different: it absorbs sound primarily at high frequencies. The lower the frequency, the less effective the foam is at absorbing sound.
The general principle:
It’s important to understand that halving the foam thickness increases the minimum frequency range at which it effectively absorbs sound, as if raising the frequency by one octave.
This explains why covering studio walls with heavy carpets or textiles is an ineffective strategy for reducing low and mid frequencies, since these materials only absorb very high frequencies. Low-frequency sounds require special solutions: thick panels or bass traps placed in the room’s corners. Foam in these cases is not suitable.
You might have read articles about how technical editor Hugh Robjohns and I installed acoustic foam panels on studio walls. However, before starting such work, it’s important to understand the limitations of these materials.
For example, if you cover a mirror with dense black fabric, light will be fully absorbed and won't reflect off the mirror. With acoustic foam, the situation is different: it absorbs sound primarily at high frequencies. The lower the frequency, the less effective the foam is at absorbing sound.
The general principle:
- A 10 cm thick acoustic foam panel placed directly on the wall effectively absorbs sounds above 200–300 Hz.
- A 5 cm thick panel is effective above 400–600 Hz.
It’s important to understand that halving the foam thickness increases the minimum frequency range at which it effectively absorbs sound, as if raising the frequency by one octave.
This explains why covering studio walls with heavy carpets or textiles is an ineffective strategy for reducing low and mid frequencies, since these materials only absorb very high frequencies. Low-frequency sounds require special solutions: thick panels or bass traps placed in the room’s corners. Foam in these cases is not suitable.
Read also: Alma Libre - The New Recording From Grammy Winning Team
Alternative Materials and Solutions
While acoustic foam is convenient, there are more effective materials. For example, Rockwool insulation panels can be fixed to walls with one or multiple layers. For aesthetic reasons, these panels can be covered with fabric. Rockwool material matches or even surpasses foam in effectiveness but requires some skill for DIY installation.
One popular technique to enhance absorption efficiency is to install acoustic panels with an air gap (for example, a few centimeters away from the wall). For instance, fixing a 10 cm thick acoustic foam panel 10 cm from the wall can provide low-frequency absorption almost as if you had installed a panel twice as thick. This can be done using wooden slats or panels with specially drilled holes for sound passage, or simply attaching cardboard or wooden squares to the panels and then mounting the foam on those.
Another method involves using diffusers to reduce high-frequency reflections. These are panels with protrusions and indentations a few centimeters deep. Ready-made diffusers are available commercially, but you can also make them yourself—by placing books, manuals, or CDs on shelves on the back wall, helping scatter and diffuse reflected sound waves.
Practical Implementation in a Home Studio
In a standard home studio, it's recommended to place 1–2 panels (60×120 cm) at the mirror points on the sides walls and ceiling (if the ceiling is low). Additionally, panels should be installed behind monitors—at the reflection zone—to minimize reflections and ensure clear listening. These should be roughly at the sound engineer’s head level.
The rear wall also needs attention: it's often effective to combine absorption zones (such as acoustic panels or sound-absorbing sofas) with diffusion areas. This approach helps achieve a more even and natural sound within the room and reduces spurious reflections that can interfere with precise audio work.
Room Resonances and Low Frequencies
While eliminating sound reflections in a room significantly improves sound clarity and directivity, achieving even bass balance often requires extra effort—especially if your monitors reproduce very low frequencies. Low-frequency issues are related to resonance phenomena occurring at any frequency that is half or a multiple of the room’s dimensions, aligning with the room’s modal frequencies. The smaller the room, the wider the range of modal frequencies, increasing the likelihood of uneven bass response and dips.
Typically, acoustic foam panels mainly absorb mid and high frequencies. However, if you position them a few inches or centimeters away from the wall surface—using spacers or attaching small pieces of foam behind the panels—you can enhance their low-frequency absorption. Another effective method is placing panels in the corners of the room, which helps absorb low-frequency resonances.
Depending on the room size, some low frequencies will be canceled out by reflections in anti-phase with the sound source, while others will be reinforced by in-phase reflections. This can cause fluctuations in bass levels—some frequencies will sound louder, others will diminish. In practice, this manifests as noticeable changes in bass strength when playing certain low notes.
Particularly problematic are small rooms, especially those with polygonal or cubic shapes, where bass “nulls” or “dead spots” often form in the center of the room. These are called bass traps or null zones. Worryingly, the sound engineer’s workspace is often located right in these “dead spots,” impairing accurate monitoring and mixing.
Methods for Combating Low-Frequency Resonances
To absorb low frequencies, porous materials such as acoustic foam or Rockwool insulation can be used. However, to effectively reduce bass resonances, panels made from these materials need to be very thick and properly positioned. For example, if your room has a suspended ceiling, it can be transformed into a bass trap by drilling large holes in it, filling the space between the suspended and main ceiling with Rockwool insulation, and covering the structure with dense acoustic fabric. Similarly, unused spaces in chimneys or alcoves can be utilized for bass trapping.
Due to the propagation of low-frequency energy, the most effective traps are located in the corners of the room. Ideally, these traps should span the length of the room, several tens of centimeters deep, along the intersections of walls and ceiling. Modern companies produce special porous wedge-shaped panels designed to be glued into corners. However, these can be costly and require a significant number for adequate coverage. More budget-friendly options include installing flat acoustic panels in the corners, mounted within wooden frames, with dense insulation behind them to absorb vibrations.
A fundamentally different approach to reducing low-frequency resonances involves understanding how they occur. The main cause of bass “reflections” is the rigidity of the walls: they cannot fully absorb or pass through low frequencies. As a result, much of the sound energy reflects back into the room, creating resonances and sharp dips in the bass response. These vibrations also cause walls to vibrate, generating additional sound sources with opposite polarity.
This phenomenon suggests another effective method: using vibration isolation or specialized damping structures to reduce the transfer of these vibrations, thereby decreasing the level of low-frequency resonances.
Classic Methods for Reducing Low-Frequency Resonances
One traditional approach to tackling low-frequency issues is installing a resonant panel inside a soundproof enclosure or cabinet filled with sound-absorbing material. Such a panel is designed to resonate in response to sound: part of the sound energy disperses through oscillations of the panel and the material inside. This method can reduce low-frequency resonances, but it has limitations.
First, a trap suppresses and disperses only those sound waves with frequencies close to the panel’s own resonant range. Second, some sound energy is reflected back into the room because the panel continues to vibrate for a while after the sound has stopped. As a result, the reduction of low frequencies is not perfectly uniform and requires careful selection of the construction.
Another common approach involves using heavy but flexible materials that create a barrier to the propagation of low-frequency waves. The principle is similar to how a ball thrown onto a solid concrete surface bounces much higher than when hitting soft sand: in this case, the heavy material acts as a “barrier,” reflecting and absorbing low-frequency energy.
Sand can be effective as an acoustic absorber; however, using it in everyday settings is challenging due to its weight. Theoretically, sand could be poured inside hollow wall elements or special speaker enclosures, but in a typical studio, this is impractical.
Using “Barrier Sheets”
A more practical and effective method is applying so-called “barrier sheets.” These are flexible vinyl sheets weighted with lead or mineral particles. It's important to note that these are thin, flexible materials—not heavy vinyl flooring coverings. One square meter of such a barrier weighs between 10 and 20 kilograms.
Using these sheets allows for creating highly effective acoustic traps with minimal material thickness, which is especially valuable in space-limited environments. Standard bass traps or low-frequency traps made from this material can significantly reduce resonances and make low frequencies more even and controlled.
Trap Variants Using Barrier Sheets and Recommendations
There are many ways to construct acoustic traps with barrier sheets, but the main idea is similar: a sheet of heavy, flexible material is placed a few inches away from the wall. In front of it, a layer of porous material is installed, intended to absorb high frequencies that might otherwise reflect back into the room. This approach enables an effective broadband trap with minimal depth—less than 30 centimeters.
The total surface area of the trap directly impacts its effectiveness: the larger the area, the more energy it can absorb. If the distance from your listening position to the back wall in your studio is less than 3 meters, you can fully cover the entire wall with such traps, greatly enhancing low-frequency treatment and reducing problematic resonances.
Using and Quantity of Bass Traps
You should not install too many high-frequency traps — high frequencies are easier to control, and an excess of traps for them won't provide noticeable benefits. Conversely, for low frequencies, it’s crucial to capture as many resonances as possible. Many people worry that installing bass traps might worsen the perception of bass sounds, but this is not true. On the contrary, traps eliminate reflected bass waves that distort and obscure low-frequency clarity, making them cleaner, more distinct, and more stable. As a result, you’ll be able to hear bass notes without jumps or missed beats.
General Recommendations
In most cases, especially in small rooms, it’s important to install the optimal number of traps and ensure that your listening position is not located in a “bass null” zone, where low frequencies are significantly diminished. Proper zoning of absorption and diffusion is very important for achieving a balanced and accurate sound. Proper placement ensures smooth bass response, minimizes dead spots, and contributes to an even, natural sound throughout the room.
In conclusion, it can be emphasized that creating high-quality sound in home studios is a challenging task, but one that can be effectively achieved with the right approach and an understanding of basic acoustics principles and equipment placement. It is important to remember that the key to success lies in proper monitor positioning, minimizing reflections, and balancing low frequencies. While DIY acoustic treatment requires attention and knowledge, even small, correctly implemented measures can significantly improve sound quality without substantial expense. However, caution should be exercised to avoid damaging the soundstage and overall audio quality, as improper attempts at self-treatment can exacerbate the problem. Ultimately, proper setup and a clear understanding of your room's characteristics will be the foundation for professional-grade sound in a home environment.